A woman is siting at her white desk, she is using her laptop to create a CV in Microsoft Word

How to Make a CV in Microsoft Word - 5 Step Guide

Hannah Mason
Blog

How to Make a CV in Microsoft Word - 5 Step Guide

Hannah Mason • Sep 13, 2023

I have spent thousands of hours creating CVs on MS Word. As an Executive CV Writer, creating professional CVs has become second nature to me.

I can assure you that learning how to create a CV on MS Word is worth the time and effort. A CV that looks professional, is well written and free from errors will make you stand out.

The quality of your CV indicates to an employer the kind of work that you will produce. It also says a lot about how serious you are about your job search.

Coming up

In this 5-step guide I'm going to help you to make a CV in MS Word. By the end, you'll have a professional CV that's better than 90% of your competition.

Disclosure: We are affiliates for some of these products and services. Learn more.

There are two things that you're going to need to create your CV:

1. MS Word. If you don't have Microsoft Word already, you can get a free trial of MS Word here.

2. Grammarly. Grammarly is a powerful and free spelling and grammar checker that will proof read your CV. You can get hold of Grammarly here. (affiliate)

Why should you create your CV in Word?

Starting with a blank Microsoft Word document can be daunting. There are more modern ways of creating a CV.  Graphic design sites like Canva offer eye-catching CV templates, as do many others.

But, MS Word is still one of the most accessible word processing platforms out there. Without a doubt, MS Word allows users to create a CV that looks great and is compatible with ATS.

Most recruiters use MS Word to open and read CVs

Most recruiters still use Microsoft Word as one of their primary software tools. When you send your CV to a recruiter, they will likely read it using MS Word.

Applicant Tracking Systems

Applicant Tracking Systems (ATS) process traditional style CVs created on MS Word, best. If you want to understand more about ATS and how it affects your CV, read this dedicated article.

Let's get started on your MS Word CV

I'm going to walk you through 5 easy steps for making a MS Word CV that looks great!

Step One: Setting up your MS Word document

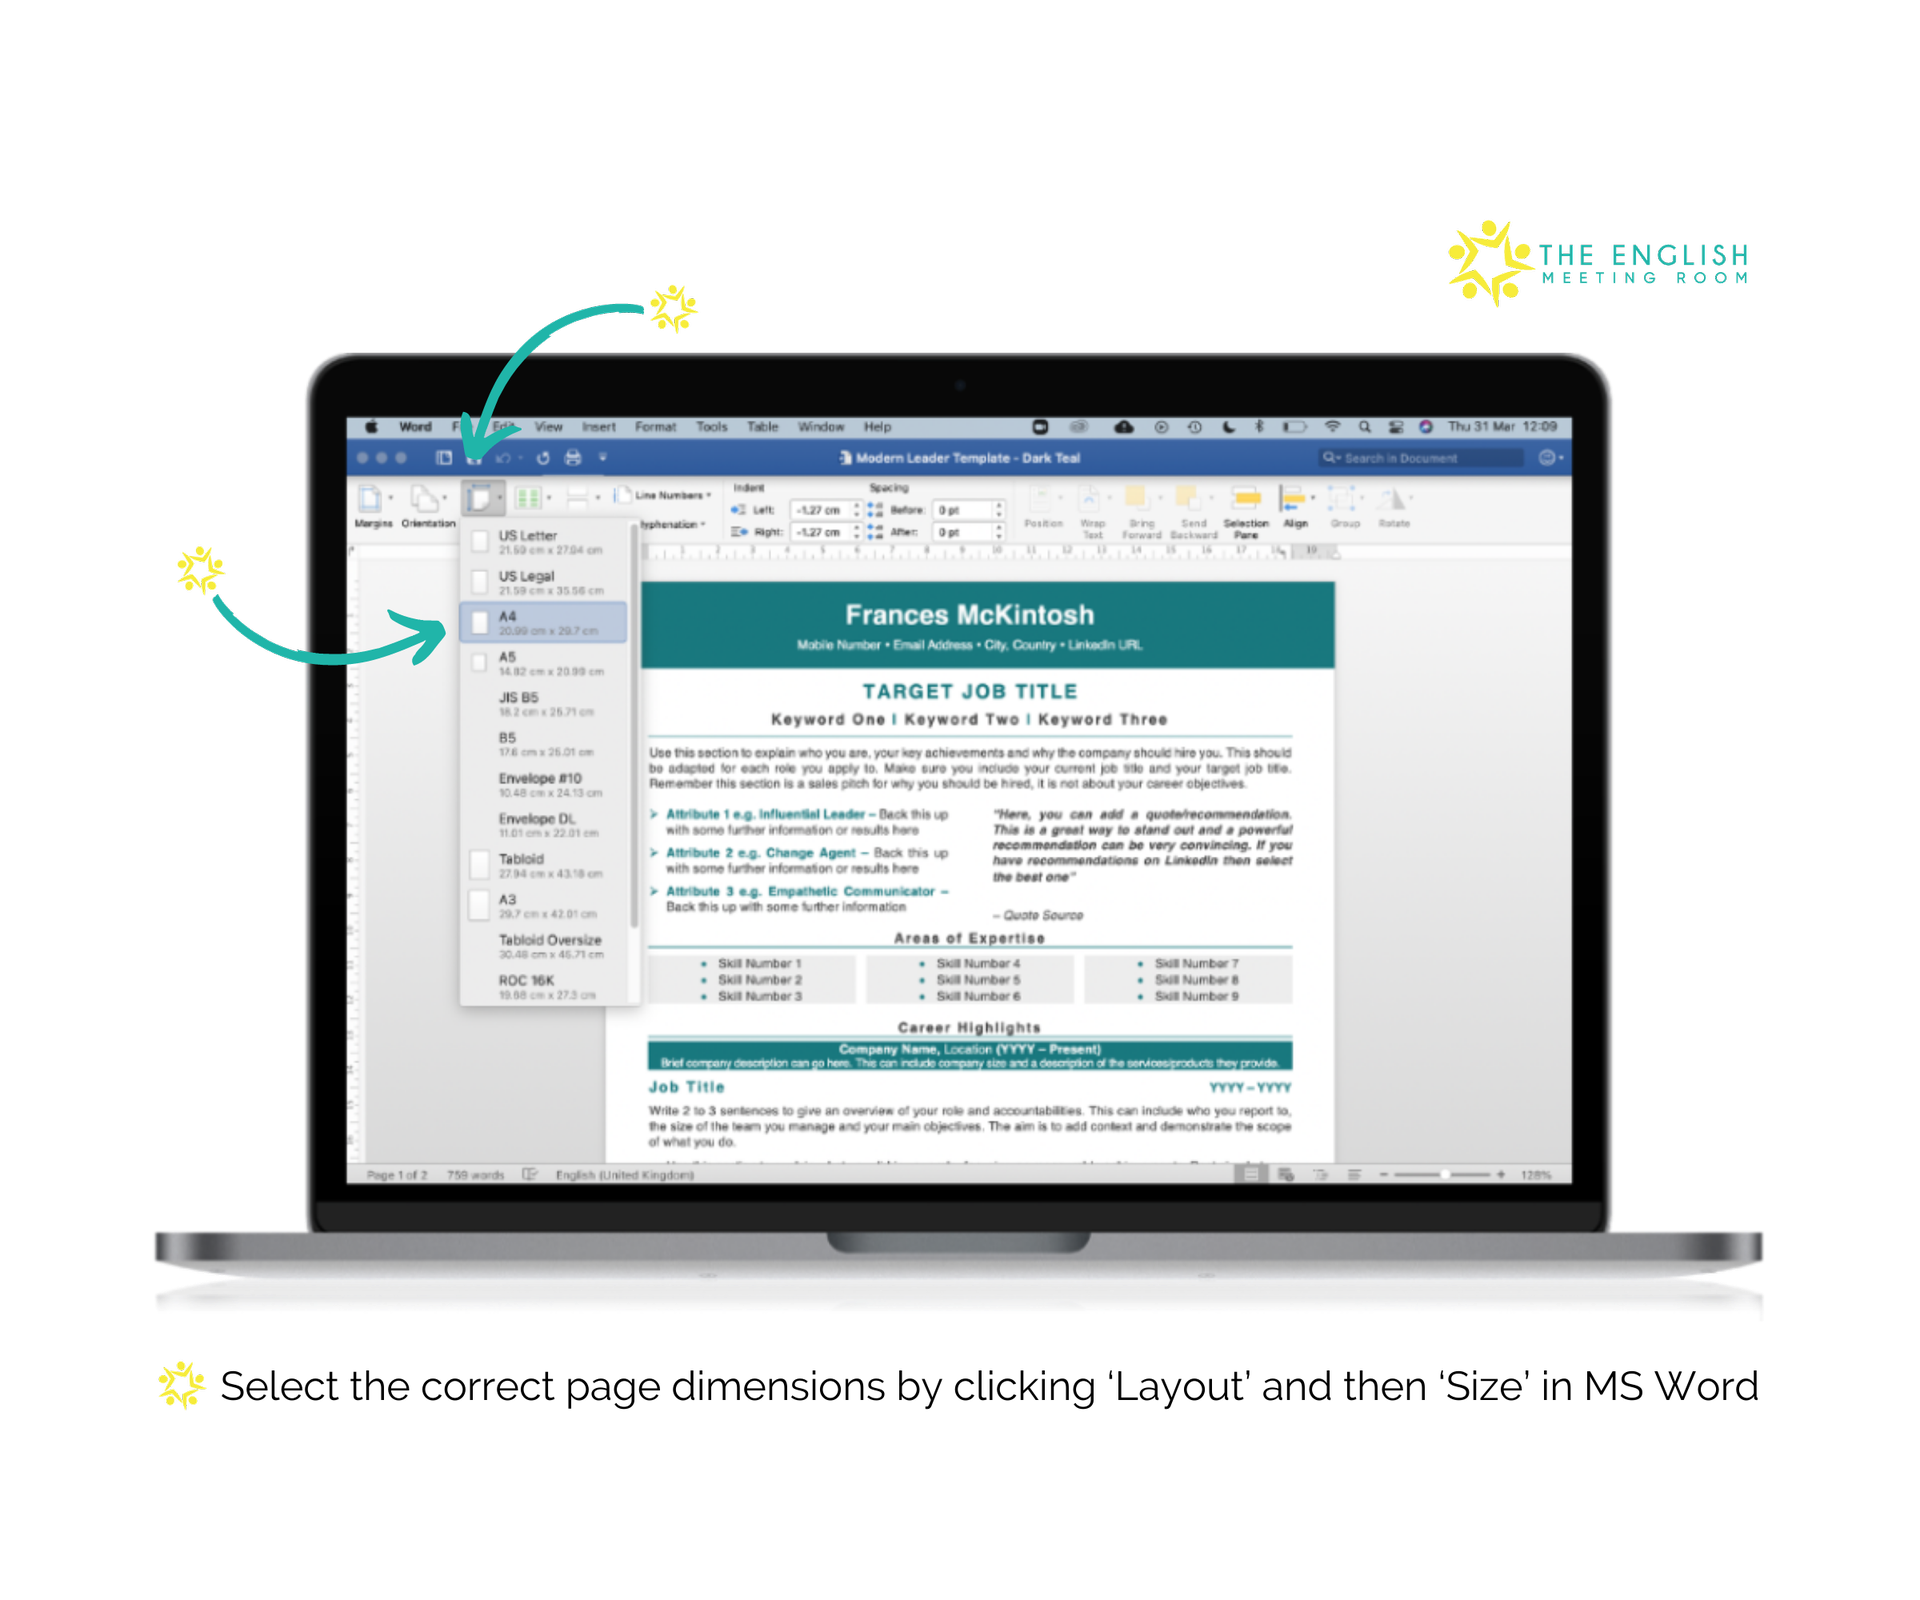
Open a new document in MS Word and select the right page size and set your margins.

In the UK and many other countries A4 is the most common document size. In the US, US Letter is the typical resume size.

In the US, US Letter is the typical resume size. You can check you have the right page dimensions selected by clicking ‘Layout’ and then ‘Size’ in MS Word.

How to create a CV in MS Word - Step One - Select the correct page layout

When I make a CV on Word I like to set the margins to narrow. This makes the most of the available space and I also think it looks better.  

You can set margins by clicking ‘Layout’ and then ‘Margins’.

Make your CV look great in MS word by narrowing the margins

Step Two: Choose the right font for your MS Word CV

Selecting the right font for your CV can go a long way to helping the document look professional.

My favourite Microsoft Word CV fonts are:

• Calibri: No-nonsense, modern, subtle and easy to read. It’s narrower than most other options which is great for saving space and maximising content.

• Helvetica: Clean, simple, modern and looks great if you want to create a minimalist CV.

• Garamond: A traditional serif font. it’s more attractive than Times New Roman and can look classic and elegant when used correctly.

• Century Gothic: A modern font that has large round lettering. Great for headings but avoid using this font for the main body of the document.

What font size should you use on your CV?

10, 10.5 or 11 are ideal font sizes for the main body of your CV.

If you go any smaller, the document will immediately appear difficult to read and may be off-putting to recruiters.

Do you need help with your CV?

Explore my services

Get your CV professionally edited and make sure YOU get noticed

Refresh your CV!

Step Three: Make your headings stand out

Incorporate headings to break up each section of your CV. This will make your CV look well organised and very professional. Your CV will feel easier to navigate if you use appropriate and defined headings.

How to make your headings text stand out

You could pick one of these styles, or use a combination.

Use the border function to underline text

This is different to underlining text. When formatting professional documents, this is the best way to create lines that span the full width of the page.

You can also click on ‘Borders and Shading’ to change the line width and colour.

Underline the headings of your CV using MS Word

Use the shading function for a splash of colour

Shading the headings can be a great way to break up the various sections of your CV. This effect is best achieved with the ‘shading’ function.

MS Word allows you to shade the headings in your CV

If you want this shading to stretch the full width of your document then you can use the ruler tool to drag the edges.

This can be activated by clicking ‘View’ and then ‘Ruler’.

Create an impressive CV using MS Word

Make the headings a larger font size or bold

This is a simple way to help your headings stand out and can be used with either of the two techniques above.

Step Four: Put your contact details on one line

Including your full address and contact details over multiple lines is a sure-fire way to make your MS Word CV look dated. Nowadays, you don’t need your full address, just your city and country.

You also don’t need to label your contact details. It is obvious what is a telephone number or email address.

I like to break up the various contact details with vertical lines or with bullets

To add a bullet mid-sentence, click ‘insert’ and then ‘Advanced Symbol’, most standard bullets can be found under ‘Wingdings’.

Use bullet points to make your MS Word CV look great

Step Five: Align your dates correctly

Aligning your dates to the right of your MS Word document can be tricky if you don’t know how. Many people hit the space bar or tab until the dates are to the right of the document, but both these methods have their issues and can result in the dates not lining up correctly.

The most effective way to do this is through the ruler tool which can be activated by clicking ‘view’ and then ticking ‘ruler’.

Once you’ve done this, you will see an arrow in the top left corner. Click this arrow until it is pointing to the left and then click in the rule, holding down the mouse while you drag the arrow to the right of the document.

You’ll then see this arrow placed on the ruler and this is the point that your dates will align to. Now, to get your dates to this point, use the tab button. One tab and the date should ping into position.

This is a little tricky to explain and so if you’re still stuck, watch the video at the top of the page from 06:05

Should you use a default MS Word CV template?

You might be thinking ‘why should I make a MS Word CV from scratch when Word already has CV templates I could use?’

There are a small selection of pre-built CV templates already available in MS Word. But don't use them! Here's why.

1. I see the same ones used all the time, and so has every other recruiter! You don’t want a CV that looks the same as everyone else’s. You want to stand out!

2. These CV templates are not particularly practical. It seems to me that these tempates were designed by people that have no experience writing CVs.

3. The space is not optimised for content. You'll need to squeeze and edit what you’ve written to fit the template. Not ideal.

4. They use text boxes. Text boxes are not easy to adapt and can cause issues with some Applicant Tracking Systems.  Many of the designs also contain infographic elements which are not ATS-friendly.

All in all, it’s best to avoid these templates and create something yourself.

What if you don't have time?

If you still feel like you don't have the time or skills to make your own MS Word CV, I have two solutions for you.

1. Download one of my own CV templates. Each one is ATS-friendly and created in MS Word. They look great and have gotten fantastic reviews from users. You can pick your favorite design here.

2. You can hire me to create and write a bespoke CV for you. Click here to learn more about my CV services.